Showing posts with label Nursery Wall Layout. Show all posts

Wednesday, December 18, 2013

Nursery Wall Layout Update: End of the Line

It's a few weeks later than I originally had planned on, but now I can say I finally have the layout done and on the wall in the nursery. I'll admit I was kind of worried that it would not turn out like I wanted, but in the end it was perfect. It's nice to sit back and admire all the work that went into it now. Sure there are a few things I would do differently if I had the chance, but all that matters is what's done and what's done is pretty nice if you ask me.

This post will just be a lot of pictures of the layout. Up first are a few looks at the entire layout.

A look at the final layout mounted on the wall in our nursery
A straight on look at the full layout
One of the best parts has to be the repaints I did on the houses and church. I had never done any kind of model painting before so this was definitely a learning experience. It was a ton of fun though and the results were exactly what I was looking for. Here are some pictures of the two houses.

I love how the new paint makes this one standout from the background.
The yellow on this one came out looking spectacular.
A look at the small fenced in horse area.
One last look at the two houses together.
When it came to scenery for this one, trees were the easiest thing I could come up with. While I would've liked to have sunk all of them into the baseboard, it was just easier to glue most of them down. The only ones I did sink in were the Woodland Scenics trees I bought at the train show.

One of the pre-made trees I glued down to the grass mat
One of the Woodland Scenics trees I made from the kit I bought
The only structure I didn't do anything with was the station, although I did need to super glue a few pieces back together after dropping it on the table top. Besides, I liked the way the red goes with the yellow and blue of the two houses, so I saw no reason to change it.

A look at the passenger station and platform
Another look at the station and platform
The other structure on the layout, the church, is one that came out surprisingly nice. I wasn't sure on the paint scheme at first, but after getting into it the simple black and white was definitely the way to go. It looks classic and simple, exactly what we were going for with this project.

A nice view of the church sitting nicely on the hill I created.
A closeup look at the tunnel on the right end of the layout.
A closeup look at the tunnel on the left end of the layout.
The only thing left to take a closer look at is the train itself, the real centerpiece of the layout. It definitely fits the overall look we were going for with this layout. I really like the bright colors of the cars and the caboose I repainted.

A closer look at the train sitting in front of the church.
A closer look at the front of UP #4441.
One last look at the center piece of the layout.
So that's it. I had a lot of fun with this project and it's got me hooked on model railroading once again. Now I just need to decide what my next project is going to be. I'm leaning towards another static shelf layout like this due to time and space restrictions. I think a full table layout may still be a ways out for me, but you never know. 

Saturday, December 14, 2013

Nursery Wall Layout Update: A Fresh Coat of Paint

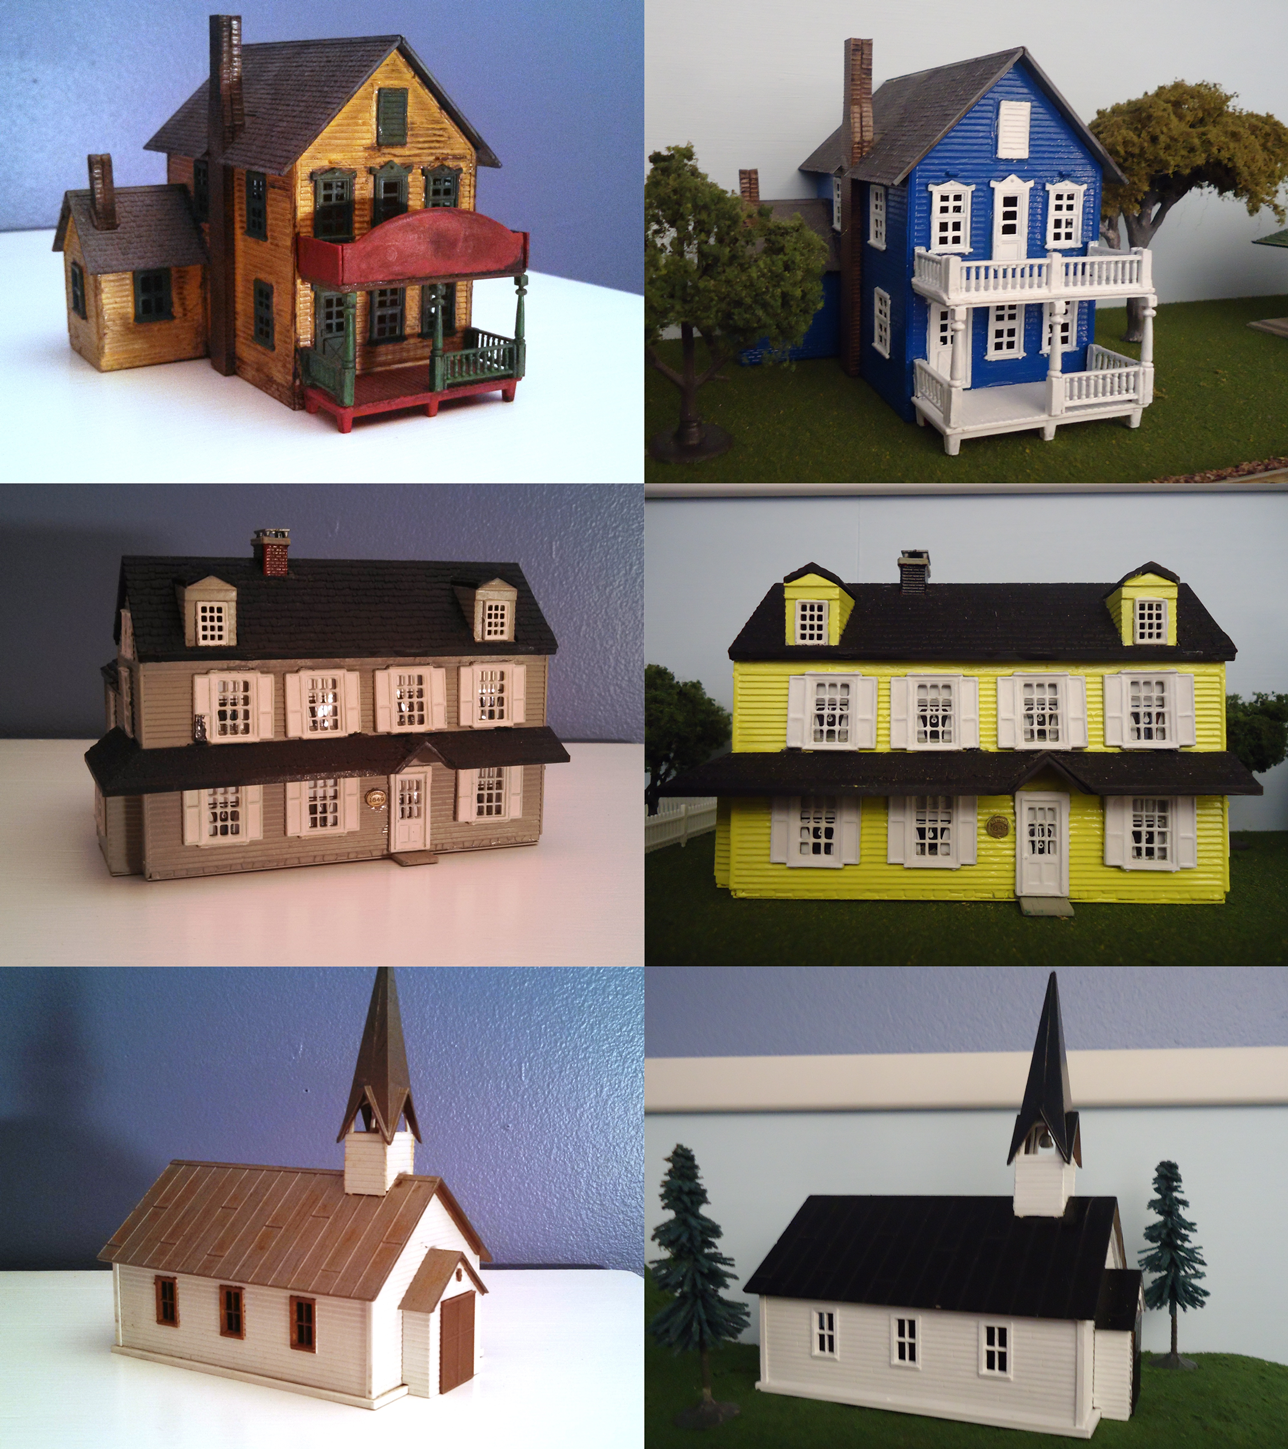
When I bought the structures for this layout, I didn't initially plan on repainting them. After bringing them all home and looking at them in the proper light, I decided I had to do something to the yellow and green house. In one of my previous posts I talked about painting this one with some supplies from Hobby Lobby. Well, I did that and then some since then. I actually went ahead and repainted the other houses as well as the church. This post will show some before and after pictures of each. 

Before and after pictures of the structures I repainted.
Just for good measure, I went ahead and repainted the caboose and the two tunnel portals. Here is a look at a before and after of those.

Before and after pictures of the caboose and tunnel portals.
These all look pretty nice on the finished layout, at least when compared to how they used to look. It was definitely worth the time it took to do the repainting. There was a bit of a learning curve for me though as I had never painted small models like these before. Now that I have everything put together, I need to take some nice final pictures of everything. Look for those sometime soon.

Monday, December 9, 2013

Nursery Wall Layout Update: Trial and Error with Foam Scenery and Paper Mache

After finishing up the foam and paper mache mountain I made for the right hand side of the layout, I thought it would be pretty simple to do the same for the left hand side. Well, come to find out, it wasn't. A couple of posts ago I showed the rough shape for that side, which was similar to the right side, just a lot longer on the side towards the middle of the layout. That being said, everything was going fine until the paper mache dried and I went to place the thing back onto the layout. 

The side closest to the end of the track looked and fit great. The other end though, due to the length and the effects of the paper mache, was lifted almost half an inch off the grass mat. I forgot to take a picture of that, so here is a sketch showing what happened: 

Green Line is Before Paper Mache, Red was After
One thing I didn't account for was the warp in the foam boards that would be helped along by the drying paper mache. At this point I thought I would need to redo the entire piece so it would sit flat. I almost did, then realized I could just cut the good side off and redo the large flat span.

The New Version of the Mountain without a Gap at the End
This was all well and good until the next morning when I realized the dry paper mache had once again caused the foam to bend slightly up on the one side. It wasn't nearly as bad this time, but still annoying nonetheless. The solution: driving a few screws through the foam and into the base board. They look pretty ugly now, but after some paint and a little fine turf, you won't even see them.

The Revised Mountain Screwed Down to the Base Board
Just to be safe, I decided it would be a good idea to put screws into the other end to hold everything in place. These were a bit more sketchy, since I had to go through the base board and into the foam from the bottom. I made sure to put some weight on top of the foam so it would hold itself down and allow the screws to grab and bring it down toward the base board.

Adding Screws from the Bottom to Better Secure the Foam
Now that I have this taken care of I can focus on the finish detail work. I have the mountains ready for both sides, all of the trees and other figures ready for placement, and a few newly painted structures ready for placement. This thing is really starting to come together. I hope it looks like I want it to when all is said and done. Even if it doesn't, this has been an excellent project to get myself back into model railroading.

Friday, December 6, 2013

Nursery Wall Layout Update: Getting There

Before I got too far into the finish detail work on the layout, I wanted to bring it up from the basement into the nursery for a test fit and to determine the final placement. Since we started this project, the plan has been to use some Rubbermaid standard shelving brackets to hang the layout on the wall. The only thing left to figure out was how high on the wall it needed to be. 

Well, we ended up deciding to plate it above the long dresser we have in the room. I used that location as a starting point and went looking for studs in the wall to screw the brackets into for extra support. After all, this thing has gotten pretty heavy after putting together four Rubbermaid shelves with a thin sheet of plywood on the back. Once I got those marked, I went ahead and fastened them to the wall. Let's just say there is no worry of this thing falling off the wall now.

A Look at the Brackets we Chose for Hanging the Layout
The brackets are actually pretty cool looking and go well with the blue, white, and grey theme we chose for the room. I originally planned on going with four, but after testing it we realized three would more than do the job and it just looked better this way.

A Look from Above at the Layout Where it Will be on Display
Now that this part is out of the way, its back into the basement to finish up the detail work. I still need to finalize a few of the buildings and put the finishing touches on the mountain for the left side of the layout. The rest of the hard work is assembling everything into a finished layout.

Sunday, November 24, 2013

Nursery Wall Layout Update: More Progress

Since my last post I've gotten a bit more done as far as the foundation of this layout. I've gotten to the point where all I have to do is finish up some of the scenery details. The grass mat has been glued down, the track and cork roadbed are nailed in place, and the lower trim piece has been installed. What that really leaves is the upper trim piece, finishing the two mountain sections and a few finishing touches on the houses and church. 

Here is a look at the basic structure of the layout so far:

A Look at the Layout with the Track and Roadbed in Place
It doesn't look like much yet, but things are definitely coming together. Aside from the "bench work" for this one, the most involved project has been sculpting the mountains from foam for either end of the layout. This is something I've never done, so it's definitely been a learning experience. Here is a look at how the mountain for the right side of the layout has come together. 

Rough Cut Foam for the Right Side Hill/Mountain
Detail Cut Foam Shown Before Gluing
Glued Detail Cut Foam During the Paper Mache Process
After a Layer of Brown Paint and Woodland Scenics Fine Turf
Not a bad look overall if you ask me. I may go in and do some touch-ups on the grass in a few of the lighter areas, otherwise I'm pretty satisfied with the results. I will say the paper mache part of this process worked out great. Originally we were worried that the foam would want to absorb the paint, so we deiced to go with a simple homemade paper mache mix of water and flour. 

Right now I am waiting on the glue to set for the cut sections of the left side hill/mountain. I will try to get some in-process pictures of that one too. Once that one is done, I need to finalize a few other little things and then we are in the home stretch. 

Sunday, November 17, 2013

Nursery Wall Layout Update: More Progress

Since my last update on this project, I've actually gotten quite a bit accomplished. At that point all I had done was buy the components for the baseboard and back wall of the shelf. Now they are all finally assembled and I have started some of the detail work on the overall look of the layout. 

Its a little hard to tell in the picture, but one of the first things I did after assembling the pieces was paint the back wall a light blue. The plan here is to paint a few clouds and give it a nice looking sky background. I also bought some grass mat from the local hobby shop and have that cut to size along with some cork roadbed for the tracks. 

Assembled Shelf Unit with Blue Background and Some Scenery Work
The next step was getting started on the foam base for the mountain at either end of the layout. On the left side, we plan on having the church sit up on a hill so it will be visible above the train. That's why there is such a large base layer of foam on this side.

First Layer of Foam for the Mountain on the Left Side
It's been forever since I've done any kind of foam sculpting like this so I really had no idea what I was doing at first. The only thing I did know was that I would have to create stepped layers since the foam sheets I bought at Home Depot only came in 1" thickness. Once I got the hang of cutting this stuff with the hand saw I bought, it was pretty easy. I just used the previous layer to trace out and cut the next one up. The nice thing is they don't need to match perfectly.

All we have to do now is get them all glues together and start to sculpt them to look a bit more realistic. We were thinking about doing some paper mache to help blend the pieces together and give us a better base to paint. After that I plan on trying the poured grass method with the spray adhesive. I've never done that before, so we'll see how it turns out.

Additional Layers of Foam for the Mountain on the Left Side
I've got a few more layers to cut for this side and then I need to do the same for the other side of the layout, minus the large flat area. I have no need to create a large sloping hill on the right side since the station will sit pretty close to the tunnel portal and there would be no room to gradually blend it down to the grass mat. 

Tuesday, November 5, 2013

Nursery Wall Layout Update: Making Some Progress

As I showed in my last post, I picked up a few things for the nursery wall layout. I really wanted to pickup some structures and definitely managed to do that between two different dealers at the show. I ended up with two houses, a church, and a train station with platform. 

Here is a look at the first house. It's a bit beat up and looks pretty weathered, which made us think we should try to clean it up and repaint it, so I went out and bought some paint and brushes at Hobby Lobby. I'll try to get some before and after pictures posted once I have made some progress.

One of the Pre-Assembled Houses I Bought at the Gibraltar Show
The next house is in a bit better shape and doesn't need as much work, maybe some touch up paint on the one shutter on the left side. Depending on how repainting the other one goes, I may think about doing the same for this one. Maybe a nice green or yellow or something.

Another Pre-Assembled House from the Gibraltar Show
Up next we have a simple church. It looks like the roof has been weathered to show some rust, so I may try to undo that and even repaint if I have to. We want to go with a fresh look on this layout since it will be just a display piece in the nursery.

Pre-Assembled Church from the Gibraltar Show
The last of the structures was this passenger station and platform. It's in pretty good shape and I don't plan on changing anything about it. I just need to do some work on the platform because one of the supports is longer than the other so it sits kind of crooked.

Pre-Assembled Station and Platform from the Gibraltar Show
Moving onto rolling stock, I also got the passenger cars and caboose that I was looking for. I saw them all sitting together marked $2 each, so I offered $6 for all four and got them no problem. They were a little banged up and some of the wheels were not positioned properly, but after some tinkering they roll down the tracks just fine.

Bachmann Union Pacifc Old Time Passenger  Coach #7 (1st One)
Bachmann Union Pacifc Old Time Passenger Coach #7 (2nd One)
Bachmann Union Pacifc Old Time Passenger Coach #9
Bachmann Central Pacific 4-Wheel Caboose
After the show I stopped by my parents house again and picked up the locomotive that I am borrowing from my dad for this layout. It's a Union Pacific 0-6-0 steam locomotive numbered 4441. Not sure who makes it or how old it is, but it works well with the theme we wanted for this project.

Union Pacific 0-6-0 Steam Locomotive
I also got a start on building the shelf that will support this layout. After some shopping around at Home Depot, I decided to buy some of the pre-finished shelves that Rubbermaid makes. To make a six-foot span, I bought four sections that were 36" long, two for the base and two for the backboard. To hold the shelf up, I bought three of the steel support brackets designed for these shelves. 

The Beginning of the Assembly Process for this Shelf Layout
Definitely some decent progress if you ask me. That being said, I still want to get this finished by the end of the month, so I have some work ahead of me. At least I don't need to mess with any wiring or the issues that can come with it. The next step is determining how I want to do the scenery.

Sunday, October 20, 2013

New Project: Nursery Wall Layout

Before I get to building a full size layout for myself in the basement, I have another small side project to work on. My wife and I have decided to go with trains for the theme of our new nursery, which means I wanted to work in some kind of layout. At first I wanted to do an around the room running setup, but found that would not work out so well. My other option was to do a non-operational display layout on one of the walls. 

Now that I have taken some measurements, I've decided to go with a six foot long layout that will be mounted to the wall. I plan on using five pieces of Atlas 9" straight snap track for the center of the layout along with one piece of Atlas 18" radius snap track at either end. The idea we came up with for each end is to create a false tunnel entrance so it looks like the track leads into the wall. Beyond that, I still need to decide a few things like what locomotive and rolling stock we are going to display as well as what kind of scenery we'd like to have. 

This project is officially under way now that we hit up one of the local hobby shops the other day (Empire Hobbies) and bought the code 100 Atlas track we needed (plus a few extra pieces for myself) and a nice pair stone tunnel portals from Pre-Size Model Specialties. 

(2) Cut Stone Portals, (2) Atlas R18" Snap Track, (10) Atlas 9" Snap Track
Before I start cutting any wood for the shelf that this will sit on, I thought it would be a good idea to sketch out what I wanted this thing to look like. Here's something I threw together in SCARM (Simple Computer Aided Railroad Modeler) as a starting point. It's got the basic track layout, the two portals, and some possible spots for buildings and trees.

2D Track Plan Generated with SCARM
To get a better idea of what this might look like, I used the 3D viewer option in SCARM. Here's what the rendering looks like. It's pretty crude, but definitely helps bring the track plan to life.

3D Rendering Based on 2D Track Plan from SCARM
We aren't looking for anything too complicated here, just something that would look nice on the nursery wall and be a little bit more than just a picture. I've still got some figuring out to do, but this is the general concept and will serve as a guide for the building process.

As a self-imposed deadline, I've got until around December 1st to get this thing built and hung on the wall. In the mean time, I need to decide which era this layout is going to be and what we want as far as a locomotive and rolling stock.