Monday, March 31, 2014

Ideas for a Freelance Model Railroad

One of the things I've been thinking about lately is what type of railroad I want to build when I decide to go big and make something larger than a 3-foot shelf layout, I'm talking at least a 4' x 8' layout in my basement. The problem I have is not knowing which prototype railroad to model. My ideal layout would be based on the Detroit & Mackinac, but there is definitely some degree of limitation that comes with a railroad like that. I want to have more freedom than just trying to replicate something in the real world. That leaves me the option of coming up with a freelance model railroad.

Doing a freelance railroad opens up all kinds of possibilities, everything from custom painted locomotives and rolling stock to unique structures and scenery. I know I'm just getting started in all of this and have a lot to learn, but I think it would be a lot more fun and enjoyable to create something of my own. I already have a lot of ideas in my head for different industries and locations that could be part of a fictional freelance model railroad. Here's some basic info:

Railroad name: Michigan Consolidated (MCON)
Location: Michigan
Era: 1980's - Present Day (Diesel Only)
Possible Industries: Automotive, Consumer Goods, Manufacturing

An example of some real life industry supported by rail in Michigan (Chrysler Assembly Plant)
That's a pretty good start at setting some parameters for my future long term layout. For the short term, I'm thinking I can work this into my office shelf layout project and come up with something along those lines. I'm planning on taking my SD40-2 project and making that my first custom locomotive for my freelance railroad. Beyond that I have an old Union Pacific SW1500 and Norfolk Southern GP50 that would make for some additional locomotive customization practice.

Before I can do anything with painting these locomotives with a custom scheme, I need to come up with said custom scheme. I'm working on some ideas now, nothing too complex, and it's coming along nicely so far. I'm hoping to have some ideas ready to post here soon. Until then, I will continue researching what I want this freelance railroad to be and hopefully get a better start on my office shelf layout with this new theme in mind. 

Monday, March 24, 2014

More Progress on the SD40-2 Rebuild

In my last update on this project I mentioned that I may end up rethinking the paint scheme. Well I did and yesterday I got that process started by beginning to remove the yellow paint I put on with the airbrush. When I first started painting this thing I went right on top of the factory paint job. It was great practice for getting the airbrush technique down, but the finish wasn't so good. The paint began to cover up a lot of the small details molded into the shell. Rather than get too far down that path, I decided I would cut my losses and start over.

To do that I brought out the isopropyl alcohol and brake fluid again. The alcohol seems to take a bit more work, so I've been using the brake fluid more on this one. Below you can see the results of about an hour of work. The front half is where I put down the yellow, so that's going to take even more work. The back half is starting to look pretty good. I'd say after a couple more hours this thing will be completely stripped and ready for some detail work then primer and paint.

Removing my first layer of airbrushed paint as well as the factory paint from my SD40-2 locomotive.
Now that I have this part of the process well under way, I need to start thinking about any detail parts I want to try and add. I know I'd like to at least do something with headlights and possibly ditch lights. Other than that it's pretty wide open. I think I am going to come up with a custom paint scheme for a fictional railroad, so anything's possible.

Saturday, March 22, 2014

Repainting an Old Boxcar

Lately I've kind of been all over the place when it comes to my model railroading projects, but the one I'm focusing on today is the old San Jose Sharks boxcar I posted back in October, click here to see the original post. I wasn't sure what I was going to do with this one when I got it and mentioned maybe using it to practice painting and decals. Well, that's exactly what I am doing with it now and I've been learning a lot making use of it. 

It started when I was trying out the airbrush as this boxcar served as the very first test subject. After that it became the guinea pig for testing paint removal methods. So in the last few weeks I've been working to completely remove the original green paint job. I ended up using a combination of brake fluid and isopropyl alcohol to get the job done. Turns out this thing was originally a Model Power boxcar with a GE Lamps paint scheme. Click here to see an example. 

A look at the 50' boxcar with the green paint completely stripped away.
I did the best I could to remove the green paint, but that left the factory paint somewhat intact underneath. Rather than risking damage to the plastic, I decided to leave it as is and start painting over it with the airbrush. I went with the Testors acrylic "rad red" that came with the kit. It's a pretty nice looking red and I was thinking about making this boxcar a part of the little display track I built. It will look nice behind the Santa Fe locomotive I'm working on assembling. 

Working on painting the boxcar red in my makeshift paint booth. 
I've got the first coat down and it's looking pretty good so far. There are definitely some areas that will need a few more coats to completely cover the GE Lamps paint scheme. Other than that it just needs a quick once over with my Model Master flat overcoat. Then I need to get myself a set of Santa Fe 50' boxcar decals and try that out. 

Thursday, March 13, 2014

Prototype Pic of the Day #6

Canadian Pacific AC4400CW #9777 | Image Courtesy of Tim Stevens via RailPictures.net
As a final follow-up to post number four in this series, here is a picture of Allegheny and West Virginia (AWVR) #777 from the movie 'Unstoppable' after it had been repainted back to its proper Canadian Pacific paint scheme. Gotta love the rainbow in the background, it almost makes the picture look too perfect, doesn't it?

Wednesday, March 12, 2014

Prototype Pic of the Day #5

Canadian Pacific AC4400CW #'s 9782, 9751, 9777, 9758 | Image Courtesy of JL Scott via RailPictures.net
As a follow up to my last post in this series, here are more locomotives from the movie Unstoppable. There were actually four CP units painted in the AWVR scheme, two for #777 and two for #767. This is a neat transition shot where the real road numbers have been spray painted over the ones used in the film. Not something you see everyday, is it?

Tuesday, March 11, 2014

Weathering Ballast

In my last post I mentioned how I thought the ballast I laid on my test piece of track was a bit too bright and unrealistic for my tastes. That was just a result of throwing down only one type of ballast, which was one of the brighter colors available. I also know that I should've gone with a smaller size, but there's not much to do about that now. For the coloring though, there is something I wanted to try: weathering. 

I did some searching around online and found that painting the ballast with a dark wash might give me what I was looking for. To do that I just needed to mix some black acrylic paint with water to dilute it. I read that a 10 to 1 ratio of water to paint would work best, so that's what I was shooting for. Once the mixture was ready, all I had to do was grab a small brush and start painting away.

Here is a picture of the ballast after I applied the dark wash:

Ballast and track after weathering and removing the paint from the top of the rails.
While there may not be a huge difference between the before and after, it's enough for me and looks pretty good. The only other thing I did was remove the brown paint from the top of the rails. There was just something a little off about having that, so I decided it had to go.

This is pretty much it for this thing for now. I may want to paint the wood base before using it as a display piece for my Santa Fe C44-9W as soon as I get all the pieces on it. I think that will look pretty good on my desk. Now I just need to find myself a Santa Fe boxcar to go along with it. 

Monday, March 10, 2014

Trying Out Some Ballast

One of things I wish I did was add ballast to my nursery wall layout project. I just left the track nailed down on top of the cork roadbed in the interest of saving time. It's not that it looks bad or anything, it's just not as realistic as I would've liked. That being said, I am going to make sure it is one of the things I include in my office shelf layout. Before jumping right into it for that project, I decided to make myself a quick section of track and roadbed mounted to piece of wood for some ballast practice. Plus it would work as a neat little display track for a locomotive and one piece of rolling stock, at least that's the plan for now. Here are some pictures of the ballasting process. 

Putting down the ballast proved to be pretty time consuming.
Here is a closer look at the ballast before gluing.
A look at the ballast soaked with my 50/50 mix of water and Elmer's glue.
The end result after the glue dried, not bad if you ask me.
A couple of things I've learned from this:

1) Coarse ballast is not the best choice for HO scale, it just looks a little too big if you ask me
2) I should've mixed in another color ballast, something darker, to make for a more prototypical look

There's really not much I can do about the fist thing, but I think I've found a solution for the second. Why not try to weather the ballast a bit and give it a more realistic look? I've been looking around online for techniques to do so and I think I will try using a dark wash to add some color. I'll try to do that here soon and get some more pics posted. 

Sunday, March 9, 2014

Prototype Pic of the Day #4

Allegheny and West Virginia AC4400CW #777 | Image courtesy of Kyle Norek via RailPictures.net
Here's another one from the 2010 Film 'Unstoppable' starring Denzel Washington and Chris Pine. This time it's the "star" of the movie as 777 was the lead on the runaway train. Apparently, this one is a repaint of Canadian Pacific #9777. I wonder if that was a coincidence how the road numbers were so similar.

Saturday, March 8, 2014

Detroit & Mackinac Herald King Decal Set for Alco C425's

Lately I've been on the lookout for anything Detroit & Mackinac that I can find on eBay and at train shows. While there has been plenty of rolling stock, relatively speaking, I haven't come across any locomotives for sale and I'm starting to think I will never find one. Then I came across something I hadn't seen before, a decal set for detailing an Alco C425 in the D&M paint scheme complete with numbers, logos, and proper striping.

The set comes from Miller Advertising out of Manitowoc, Wisconsin, at least that's what is printed on the slip that came with it. Not sure if this is even a company anymore because when I did some searching online I found a standalone Herald King website that is based out of Bettendorf, IA. Anyone know anything about them?

Here's a look at the sheet of decals:

A look at the full sheet of decals.
Here's the instruction sheet that came with it:

Instructions page provided with the decals.
Now I just need to find myself an undecorated C425 to try this out on. I love that they have included the specific paint colors needed to fully customize for the D&M paint scheme. I'll have to be on the lookout for these color paints now too. 

Thursday, March 6, 2014

Prototype Pic of the Day #3

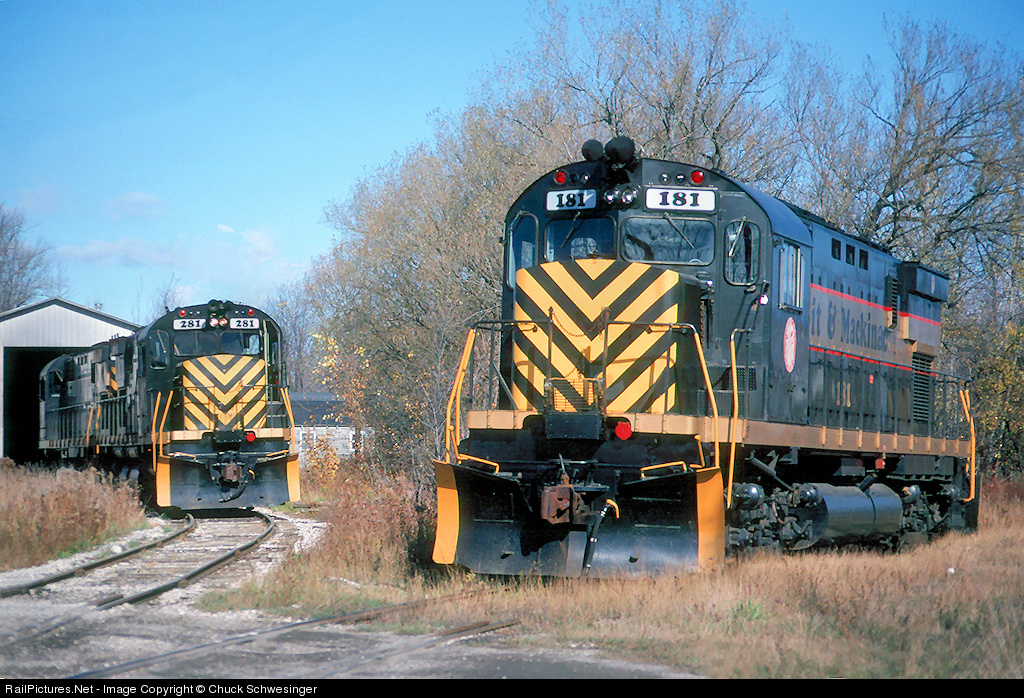
Detroit & Mackinac Alco C425's #181 and #218 | Image Courtesy of Chuck Schwesinger via RailPictures.net
Since I haven't really had any project updates to post lately, I thought another prototype pic would make for a good one. This one is a great shot of some D&M power from the mid 1980's. This photo was taken outside of the D&M engine house in Cheboygan, Michigan. I love the paint scheme on these things, especially the striped noses.