Thursday, February 27, 2014

Trying Out Some Track Painting

Ever since I decided to start building my office shelf layout, I've known that I would need to do more work with the track than I did with the nursery wall layout. For that all I did was nail it down on top of some cork roadbed and called it good. That was fine then, but for this project I want to make it look as realistic as possible, which means getting into ballasting and painting the track.

So the other night I was working on laying out some track for the office shelf layout and I decided to take a few extra pieces of straight track and make myself a quick and easy display piece for testing out ballasting and track painting. It was at that point I realized I didn't have an good tie or rail colored paints with my modeling stuff, so I went searching around the basement and found a gallon of paint that the former owners left when they moved out back in the summer. It was a nice looking darkish brown, so I figured why not try it out? Here's what I came up with.

A look at the before and after for the brown paint I found in the basement
A look at the finished paint job
In case anyone was wondering, the paint I used was actually a porch and patio floor paint from BEHR. The color is listed as dark walnut. It doesn't really look all that bad if you ask me.

A look at the lid of the BEHR paint I used to paint the track
Just based on the fact that I threw this idea together in like 10 minutes and I used leftover paint that someone else bought and left in my basement, it looks pretty good. It may not be 100% realistic, but it's close enough for me and looks much better than the black ties that these used to be.

Monday, February 24, 2014

New Locomotives: More from My Childhood Collection

I was visiting my parents house again the other day and my dad said he found another box of train stuff from back when I was as a kid, which means it is probably 15 years old by now. I wasn't sure what could even be in there because its been so long since I had seen any of that stuff

Four new locomotives for my growing collection. 

Of the four, the Santa Fe C44-9W on the left is my favorite. I remember buying that Athearn blue box at a train show and thinking it was the coolest thing. When I opened the box, there were a ton of parts floating around since I never finished putting it together as a kid. I think I will add that to my list of things to do now so I can use it as a nice display piece until I get a working layout built. Once I get the rest of the detail parts added, I will try to take and post some better pictures.

The next one over is a Pennsylvania Railroad dummy locomotive and is actually in pretty good shape. All of the hand rails are intact and there doesn't appear to be any other parts missing. That could be another good one for some kind of display model. 

The last two are pretty similar other than the paint schemes. The Rock Island is powered and the Northern Packfic is a dummy. The Rock Island is in rough shape with the whole lower front end missing along with the coupler. The Northern Pacific is in much better condition.

Sunday, February 23, 2014

Train Show Pickups: WGH on Tour Show in Novi, MI

So after a few months of looking forward to it, I made it out to the Word's Greatest Hobby on Tour show yesterday and the Suburban Collection Showplace in Novi, MI. I wasn't sure what to expect because this one seemed to be set up a bit differently than the train shows I'm accustomed to. Their website says, "the show is intended to introduce the general public to model railroading in an entertaining, lively and family-friendly atmosphere." 

I figured there would be more kids related stuff than a normal show, and there is nothing wrong with that, I just was out looking for the things I need specific to my projects and could've done without all the extras. I'm already into the hobby, so I could avoid any of the booths that were more of the introductory or informational type, but those are good for the hobby in general so I had no issue with them being there, other than maybe the extra volume of people there all day. 

Anyway, let's focus on what I did at the show now. After walking through the entire 100,000 square foot exhibit hall, I was surprised to see how few of the booths actually had a great selection of HO stuff that would work for any of my projects. As usual, I was on the lookout for any and all D&M stuff, but came across nothing this time. Beyond that there were some great booths for newer stuff from the big manufacturers, but nothing really caught my eye. 

My main goal was going to be getting some supplies for my office shelf layout, specifically some LH and RH turnouts and some ballast for completing my track setup. I managed to find both, at two separate booths. At one, which was a mix-bag of things from all scales along with other toys and junk, I managed to get ten used turnouts for $1 each. At another I grabbed a bag of coarse ballast to practice some different ballasting techniques. Finally, I came across a great deal on 12" x 36" sheets of cork roadbed, so I grabbed one just to have for future use. 

Ten used turnouts, a bag of ballast, and a 1' x 3' sheet of cork roadbed
So all in all, it was a decent show, but nowhere near as good as I expected it to be. I did come away with some good stuff to help keep me moving on my shelf layout, which is good, but I feel like I could've gotten the same kind of stuff from a smaller, more focused show that didn't cost $16 to get into. Anyway, I've got a few of these smaller shows to look forward to in the coming months, so hopefully I'll be able to check some of them out and get some more great stuff.

Tuesday, February 18, 2014

Office Shelf Layout: Making Progress

In addition to messing around with removing paint from models lately, I've slowly been making progress on my office shelf layout. As of my last post about the project, I had completed the basic structure of the layout by fastening together two pieces of pre-made shelving from Rubbermaid. 

Now I've moved onto the next steps and have gotten the blue sky background painted. Below is a picture of how it looks now. I am thinking of sticking with the plain blue just to keep it simple, but have been on the lookout for any backdrop ideas that would work with the theme I'm going for. 

A look at the paint drying on the blue sky background for my shelf layout.
The next step is going to be getting some more grass mat and tacking that down to the base board. What I don't know is what I will use to fasten it down. On the nursery wall layout I used Loctite spray adhesive, which seemed to work at first, but eventually started coming up over time. I'm thinking of just using regular hot glue, but we'll see, maybe there is something better out there. 

Tuesday, February 11, 2014

Model Paint Removal: Brake Fluid vs. Isopropyl Aclohol

Now that I am in the middle of repainting my SD40-2 it occurred to me that I never really looked into any tutorials or best practices for repainting a locomotive. I wish I would have now because after reading a few posts over on Model Train Forum, I realize I should have stripped the paint off the locomotive first before airbrushing another coat on top of what was already there. 

After gathering all the information I could, I found that the two most suggested methods were brake fluid and isopropyl alcohol, both relatively cheap and easily accessible options. Since I have never done either, and I was already planning on going to Walmart earlier today, I figured I would buy both and see which worked better. 

The guinea pig for this test had to be something other than the SD40-2 because I did not feel like ruining the nice coat of yellow I already put on half of it already. So, I decided I would try them out on the San Jose Sharks boxcar I showed off on here a while back. I had already done some test painting with the airbrush on it, so I figured it would be a good test to try and get both the factory paint off as well as the new paint I added recently. 

DOT3 brake fluid vs. 91% isopropyl alcohol.
Before I tried either option on the boxcar, I taped it off into separate sections so it would be easy to tell which one has a better end result. On the left is the section for the brake fluid and on the right is the section for the alcohol.

A look at the boxcar before trying either option. 
I've read that you really have to soak the entire shell for a good amount of time to get the job done right , but for now I just wanted to do some localized surface testing and only applied either one with some wooden cotton swabs to the taped off areas. If it works then maybe I can move onto fully submerging it.

Brake fluid appears to be working better after 10 minutes or so.
After 10 minutes of applying generous amounts via cotton swabs, I have to say the brake fluid works much better. I am completely through the two coats of paint I added across the entire section, while there is only a small area cleared away by the alcohol. I even started getting some of the green factory paint to come up with the brake fluid. 

I left a good layer of liquid on either side when I finished up earlier tonight, so we'll see how that goes come tomorrow. I'll try to have an update posted in the next day or so of how the tests went. At that point, I will pick which option I want to go with and work on stripping the entire shell. 

Monday, February 10, 2014

New D&M Rolling Stock: 50' Berwick Boxcar

This one will be the third boxcar for my collection of Detroit & Mackinac rolling stock. It comes from Branchline Trains Blueprint series of models. The kit came fully assembled and in pretty good shape. I was lucky enough to grab it on eBay for $9.49 plus shipping. Here are some pictures of it.

D&M 50' Berwick boxcar #20235 from Branchline Trains.
A look at one end of the car.
A look at the other end.
A look at the excellent decals on the left end.
A look at the decals in the center of the car.
A look at the decals on the right end.
Just for fun, a look at the box from Branchline.
This has definitely become my new favorite piece of rolling stock. I love the level of detail that went into this thing. Everything from the clean and crisp decals to the separate grab irons. Doesn't get much better than this if you ask me. 

From what I've seen online, there are a few other car #'s out there for this model, so I will definitely be on the lookout for those to help build my D&M fleet of rolling stock. I just love the look of these cars with the white on red paint scheme. It's simple and effective. Makes me want to hurry up and get to building a running layout already so I can see these things in action. 

Saturday, February 8, 2014

Building the Foundation for My Office Shelf Layout

In addition to getting some airbrushing in the other day, I got some work done on the base for my office shelf layout. I had already bought the Rubbermaid shelf pieces from Home Depot a while back, so all I needed to do was cut them down to size and assemble them.

I had to take the 36" pre-made pieces down to 32" and did that with my new table saw. First time I've used one of them in a long time. Those were the easy cuts, the hard one was ripping 1/2" off the entire length of the flat base piece. Once that was done and I made sure all of my fingers were still intact, I moved onto drilling some holes in the back of the vertical piece for assembly.

Drilling holes along the bottom edge of the back vertical piece.
One of the things I learned from my nursery wall layout was to countersink any holes on the back or bottom sided to prevent screw heads from scratching any surrounding surfaces.

Countersinking the holes on the back of the vertical piece.
The only thing left after the countersinking was the final assembly. I put five screws along the length of the base, which made this thing pretty darn sturdy. Since it will just be resting on a bookshelf, I really shouldn't have to worry about the strength of the joint like I did for the nursery layout.

Finished L-shape base ready for the next steps
The next step as far as construction will be getting some grass mat down on the base and possibly painting a blue sky backdrop on the vertical piece. Other than that I really need to finalize a track plan for this thing. I think I am leaning toward option #3 from my last post about this project.

Friday, February 7, 2014

More Progress Repainting the SD40-2

After clearing some space in the basement, I was able to find some time to get back at repainting my Soo Line SD40-2 as part of my new side project. Right now I am just trying out the airbrush and chose the yellow because it was the brightest and boldest of the colors that came with the kit. I may or may not keep this color, it all depends on how I think it looks when I'm done with it. So far it's looking like I will have to change things up, you'll see what I mean.

Here are some pictures of where I am at now:

A look at the SD-40 after several coats of paint from the airbrush.
A look at the right side after removing the blue painters tape.
A look at the left side after removing the tape.
A closeup look at the seam left by the painters tape.
That last pictures is what I was referring to. There is a pretty nasty looking transition from the new paint to the old and I'm not sure how to fix it right now. I may just leave it for now and move onto the next color and see what happens. 

Right now I have blue, red, orange, and black to pick from until I decide to go out and get any other colors from Hobby Lobby. I think something with the red and/or orange with some black added to it would look great. I'll have to work up some ideas for how I want the overall paint scheme to look. 

Thursday, February 6, 2014

Prototype Pic of the Day #2

Allegheny and West Virginia SD40-2 #1206 | Image courtesy of Tom Habak via RailPictures.net
This one I found the other day while looking for examples of SD40's and just had to share it. It is from the fictional Allegheny and West Virginia (AWVR) railroad featured in the 2010 Film 'Unstoppable' starring Denzel Washington and Chris Pine. I love this movie and though it would be cool to share this here. Now I just wish I could find HO scale replicas of this and the other loco's from the movie. 

Wednesday, February 5, 2014

New Side Project: SD40-2 Rebuild / Customization

Now that I've had some time to mess around with my new airbrush, it's got me wanting to do a bit more than just practice on the Soo Line SD40-2 that I have as my current test subject. I've been see a lot of custom locomotives online and thought it might be fun to try and do one myself.

My Soo Line SD40-2 in its factory form before I started painting.
I know it will not be as nice as the ones I've seen, but you have to start somewhere, right? At this point, I think I will try to come up with a fictional railroad with a corresponding paint scheme and attempt to completely repaint the shell. Beyond that I would like to get the pieces I am missing right now, which include the following:

     - Handrails and grab irons
     - Number boards
     - Knuckle couplers
     - Ditch lights

As far as ideas for what I could do with the paint scheme, I did some searching online and found some great examples of different schemes just within the state of Michigan. I don't necessarily want to copy anything that's already out there, but would maybe use these as kind of a starting point.

A few example SD40-2's from various Michigan railroads.
So I'm not sure where this project is going to take me. All I hope to get out of it is some practice using an airbrush and just a better understanding of what it takes to work on model locomotives. I'm definitely open to any tips or suggestions that anyone has for this type of project. 

Monday, February 3, 2014

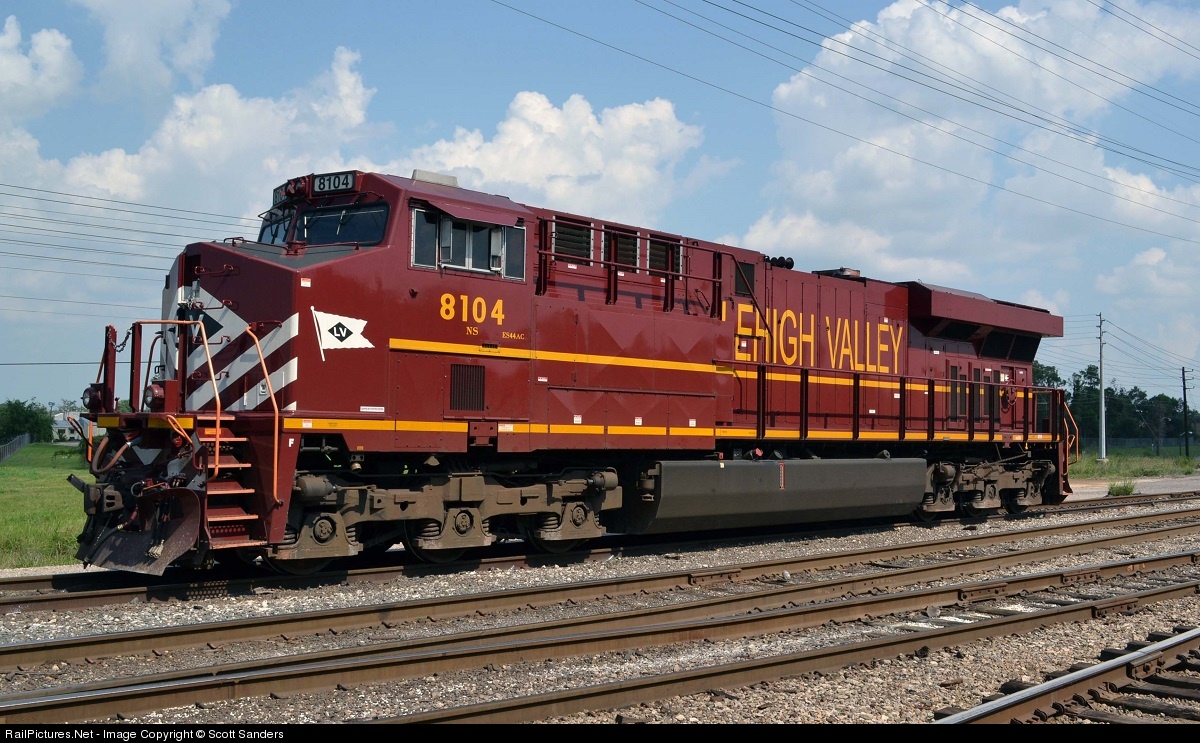
Prototype Pic of the Day #1

Norfolk Southern ES44AC #8104 | Image courtesy of Scott Sanders via RailPictures.net
This series of posts is meant to be random, just something to keep things interesting around here between updates on my modeling projects. I chose to start things off with a shot of Norfolk Southern's Lehigh Valley heritage unit because I actually saw it here in Michigan. It was sitting just outside the Sterling Yard in Sterling Heights one morning last week.